Pricefx Classic UI is no longer supported. It has been replaced by Pricefx Unity UI.
Configure Calculation Logic
- Jana Volencová (Deactivated)
The window for editing calculation logics is divided in four parts:
- Calculation Logic – The elements of the calculation logic are defined and managed here. All these elements can be used for the calculation of a price, price element or price information.
- Alerts – For each element of the calculation logic, warning messages can be set up (e.g. Margin).
- Logic element calculation description – You can enter comments in this field. These comments are not used in the calculation.
- Expression Editor – For each element of the calculation logic, a value (text, number) will be defined by an expression.

![]() You can filter, search etc. like in all grid tables and save the changed view as a preference.
You can filter, search etc. like in all grid tables and save the changed view as a preference.
The calculation logic must be saved. Click the 'Save' (or 'Save and Close') button to do so. Click 'Cancel' to go back to the list of calculation logics without saving any changes or just close the tab.
The following actions here are available:
Add and Define an Element
You can add a new element of the calculation logic by clicking the 'Add' button.
Make the necessary element settings in the columns. Right-click on the header and select Columns (pop-up) to display columns that are not visible by default.
- Type – Specifies the type of the element. There are five options:
= Adder / Markup (adding the element value to a price point). Calculation written in /wiki/spaces/KB/pages/99570116. Examples:
- Manufacturing costs as basis for the calculation.
- Regional adjustment to differentiate the prices based on regions.
- Industry specific adjustment to differentiate the prices based on customer industry.
- Volume discount
- Customer classification discount (ABC-Customer classification)
- List price
- Net price
- Margin
- Contribution margin
- Total Discount (adding all single discounts)
Type Element Name Element Expression Calculated Result A 5 5 B "A * 3 - 1" "A * 3 - 1" C B 14
Element Name – Identifies the calculation element. This is a mandatory field.
- Label – Optional value for the element.
- Translation Editor – Enables you to add a translation for the element's label. The translated label will be displayed in the corresponding language version of the user interface. In the Locale column of the editor, use the language code that you see in the locale URL parameter, e.g., 'de' for German.
- Element Expression – Shows a short excerpt of the expression entered via the editor.
- Display Mode – Defines whether the element is displayed in the different parts of the application. The options are: Price Grids, Price Lists, Quoting, Everywhere, Never and Integration. (Integration means the value is only available through the interface but not visible in Price Lists / Price Grids / Quoting. This is older concept not used much nowadays. The case there is, that a direct logic execution should see more logic outputs than the 'normal user'.)
 The setting 'Never' affects also warning messages from api.addWarning. These messages are then displayed with the next visible element (if there is any).
 - Format Type – For elements displayed in Quoting defines the formatting based on type:
- Numeric – Maximal three decimals are displayed (e.g. 2.123 or 3.32 or 4.1).
- Integer – A whole number, without decimals.
- Numeric(long) – Maximal nine decimals are displayed (e.g. 1.123456789 or 1.2345).
- Money – Always two decimals are displayed (e.g. 1.20 or 1.12).
Money (EUR)... (JPY) – Always two decimals are displayed and the corresponding currency symbol (e.g. €1.20 or €1.12 or $1.20$ or $1.12).
 This is only a format. Values are NOT converted into another currency.
- Percent – Always two decimals are displayed and the percentage symbol. The value will be multiplied by 100, i.e. 0.1234 is formatted into 12.34%.
- Text
- Link
- Matrix or Charts
- Sparkline – Displays the data as a small inline chart that presents the general shape of the variation. The element result must be a comma-separated list of numerical values. The values are stored inline, so a character limit applies depending on the column size. Sparkline is available in item grids for Live Price Grids, Price Lists and Simulations.
- Timestamp
- Date
- Suffix – Text (or text symbol) of an element defined here will be displayed in Quoting after the output value (e.g. if an element returns 3.1 and the suffix element returns 'EUR', you will see '3.1EUR' on the screen).
- Calculation Context – Used in Analytics logics to group the calculation into multiple phases.
- Condition – If you do not want to calculate this element under certain conditions, put here a name of another element, which, if returns 'false' (or 0, null, ""), will cause this element not to be calculated at all.
- Color – Defines a color for the element in Quoting and Price Lists.
- Result Group – Allows you to group the results. Assign a group name (of your choice) to all the elements that you want to have in the same group. Elements with no value for this column will end up in the group called None. If this column is completely empty, no grouping takes place.
- Hide Warnings – If checked, warning messages (e.g. parameter not found) and system warnings are not displayed in Quoting and Price Lists.
- User Group – Defines what user group(s) will see the result of the element. The total length of the user group names cannot exceed 255 characters.
 This setting has no affect on the visibility of Price List / LPG columns; to control that use preferences.
 - QC: Summarize – If checked, the value will appear summarized for all products in Quoting.
- QC: Hide if null – If checked, the value will be hidden in Quoting in case it has no value.
- Allow Override – If checked, the value calculated by this element can be manually overridden in the user interface of Price List or Live Price Grid – provided the user has an appropriate role which grants the access and the price list is not locked.
Timeout Override[s] – You can allow the element to be executed for longer time than default (5 s). The value means maximum number of seconds, which the logic in this element is allowed to run. After that, the calculation will be aborted and you will get the 'Timeout' message.
Note:- The maximum timeout value is 900 s (= 15 minutes). If you enter a higher value, it is ignored.
- The timeout clock for an element starts when the element is called first time. So if you have subsequent elements eating up a lot of time, the called element can be timed out already before it is called a second time from another element. For library elements, the clock is reset on every new (logic) element.
- If the element calls an HTTP request, the httpCall method has the same timeout as defined for the element.
- If you set the timeout to "0 s", it is ignored and the default value is used.
- Protected Expression – You can make an element's code hidden if it contains sensitive information. When a logic with a protected element is saved, the source code of this element will not be returned to the client in any subsequent fetch operations. Formula test drive will continue to work. Protected elements can be updated: sending null as formulaExpression and protectedExpression=true will keep the original code and change the other fields. The source code can also be updated if formulaExpression is not null. Protected code can never be revealed again (i.e., unchecking the option will not bring the code back).
Configure the Element Expression
After you create a new element, you can define the expression:
- Select the element for which you want to enter (or edit) the expression. The right pane is showing the expression of the selected element. The syntax can contain logic interconnections / references to data tables, mathematical functions / operations and conditions.
- Enter the expression in the Expression Editor. The Command Templates can help you with the expression syntax. They let you choose all defined Company Parameters, product and customer attributes as well as all defined calculation elements / price points from the left screen.
The element expression consists of:
- Variables – Can refer to a value of another element using its name.
- Functions – See /wiki/spaces/KB/pages/99570116.
- Number expressions – Resulting in either integer or BigDecimal (not double/float).
- String expressions
- String literals – Literal strings have to be quoted using the double quotes (").
Operators:
Brackets ( ) Less than or equal to <= Plus + Equal = Minus - Not equal <> != Multiply * And and Divide
/ Or or Modulo % Not not Power ^ Binary inversion inv Greater than > Bitwise exclusive or xor Greater than or equal to >= Binary and & Less than < Binary or | - You can check the syntax by clicking the Syntax check icon
- Test the calculation logic by clicking the Test Logic icon
Configure Alerts
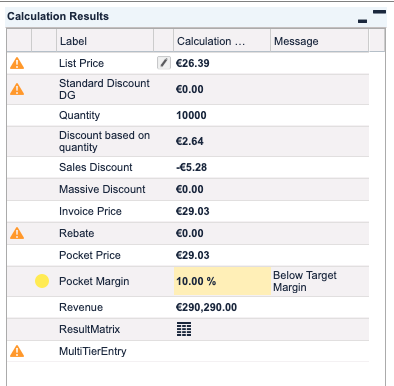
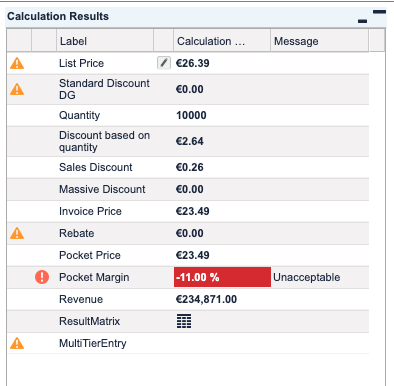
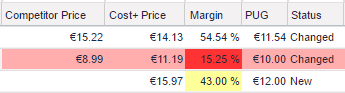
Alerts are useful when you need to set thresholds for a price point and thus communicate what values need attention. There are three alert levels, each bound with a certain color which is applied to the given cell/row:
- yellow – Typically used for values with medium severity.
- red – Typically used for values with high severity.
- critical (red with exclamation mark) – Typically used for values with very high severity.
Example:
| Yellow alert: | Critical alert: |
|
|
In Quoting and Price Lists, the alerts are shown like this:
- Critical alert marks the whole row.
- Red/yellow alert marks only one cell (which triggered the alert).
To set an alert:
- Select the price element for which you want to set up an alert.
- At the top right section Alerts select from the drop-down list an Operator (e.g. <, >) for the desired alert type.
- Enter the Threshold. For percentages enter decimal numbers: 0.1 instead of 10%.
- Enter a Message (text). This text will be displayed in Quoting and Price List.
To set up the alerts in Groovy, use api.criticalAlert(String msg), api.redAlert(String msg), api.yellowAlert (String msg).
For more details see the API Documentation.
Command Templates
Command Templates help you write the expressions – they give you guidance to build correct function calls.
For details on all available functions, see /wiki/spaces/KB/pages/99570116.
Logic Import and Export
You can export the whole calculation logic and import it to another logic in the same or different Pricefx instance.
Export a logic:
- Click the Import & Export button.
- Copy the whole syntax to the clipboard and paste it to a plain text editor. Make any necessary changes and save the file.
Import a logic:
- Open the target logic and click the Import & Export button.
- Delete the original text in the dialog and paste your exported logic. On import, you have the following options:
- Replace same elements – Elements with the same name will be overwritten by the elements from the imported logic.
- Keep label intact when replacing – The original element label will be preserved even if the element is overwritten.
- Replace all – All original elements are deleted and replaced by the imported elements.
- Click the Apply button.
![]() You can use this window also to search for text across all elements (e.g., to find where you call an API function or use a specific Company Parameter etc.).
You can use this window also to search for text across all elements (e.g., to find where you call an API function or use a specific Company Parameter etc.).
Parameter Details
For each user entry parameter used in the calculation logic, you can modify their properties and change the way the entry fields are displayed to the user.
![]() There is no check if parameters listed here are actually generated in the logic. If the name matches, the (non-empty) values are applied; otherwise the entries are ignored. Only those parameters which the logic generates are used and displayed.
There is no check if parameters listed here are actually generated in the logic. If the name matches, the (non-empty) values are applied; otherwise the entries are ignored. Only those parameters which the logic generates are used and displayed.
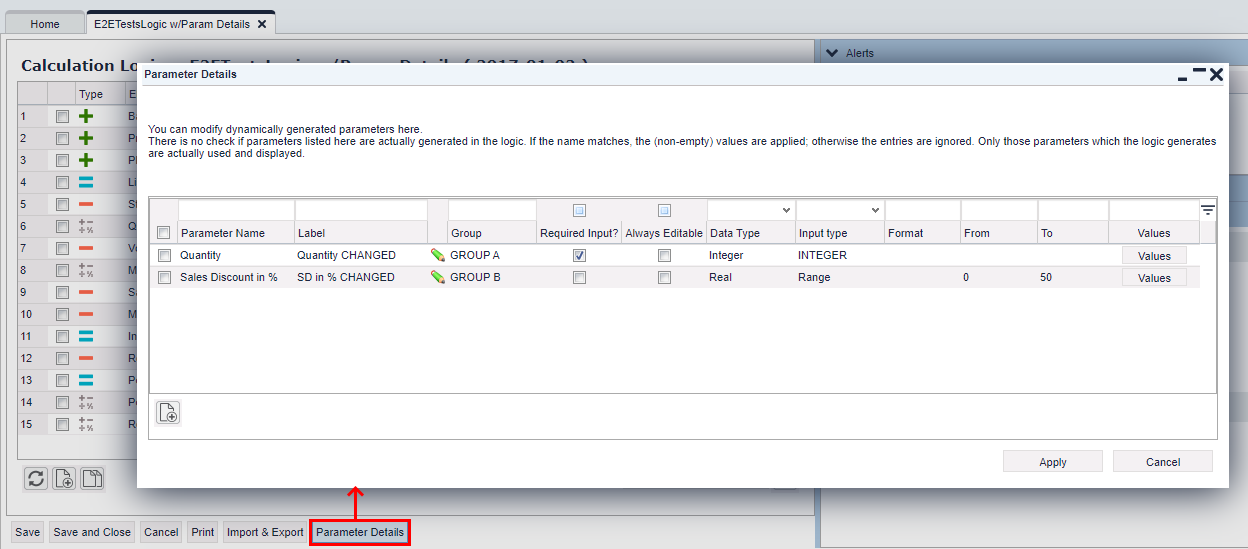
To modify dynamically generated parameters:
- In a calculation logic, click the Parameter Details button.
- Add a new row to the table and enter the exact parameter name as it appears in the logic.
- Make your settings. There are many modification options, for example:
- Override the label (i.e. the name of the input field as it is visible to the user).
Group the inputs (by assigning the same group to them). In the UI, the inputs from the same group will be shown in their own section, with the group name serving as a title.
Grouping can also be done directly in the logic using theparameterGroupattribute on the header level.Make the input always editable – this input will remain editable even if the document is in a non-editable status (e.g., an approved Quote). This type of input cannot be used to supply values to the calculation but can be handy for adding user comments to approved documents, for example.
- Depending on the selected data type, you can specify an input type (range or drop-down) or format (for numbers).
- Selecting Range for input type allows you to define a permitted range for the user input (From and To columns).
- If you select Drop-down for input type, click the Values button to populate the drop-down list with selectable values.
- Click the Apply button to save your modifications.
Save, Save and Close
During the Save operation the system also executes the logic in a special "Syntax Check" mode. If this special execution fails, the system will not save the logic!
Syntax Check
The special "Syntax Check" execution of the logic is used regularly in the system (when you pick a logic for a price list or when you add a new line to a quote) to evaluate input fields needed for the price list or quote line item. That is why it is important to perform this Syntax Check execution also during the Save operation, otherwise it could happen later that your logic will fail while creating a new price list or adding new lines to the quote.
See also the following articles in the Knowledge Base:
Found an issue in documentation? Write to us.